Want to Learn About Bulk Uploading to Shopify
When you finish the registration procedure and add your first store, the system will prompt you to upload your outset production.
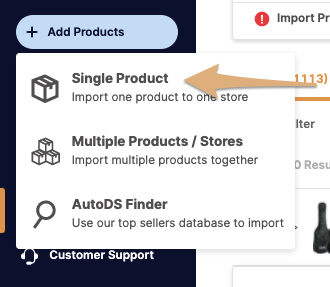
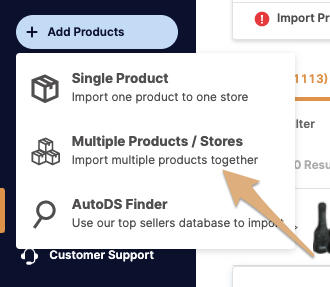
Click on the '+ Add products' push on your side bar to create the commencement production of your outset listing. Yous can cull whether you desire to upload a single production, multiple products, or from AutoDS finder. You volition as well find a quick shortcut to import your untracked in case yous take untracked listings.

Upload single product
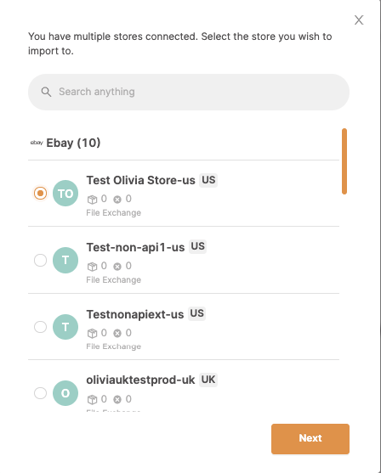
In this Import method y'all will kickoff demand to cull the store yous wish to upload to and click 'Next':
Please check the featured numbers in the following image. You will observe a detailed explanation of each featured number underneath the image.
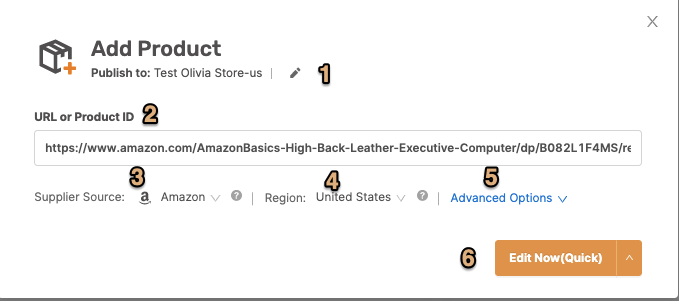
i- Selected store — here you will see the store you chose to upload to. If you want to change the store, you lot can click on the piddling pencil and choose another one.
2- URL or Product ID - put the Id or URL of the product you wish to upload
three- Supplier source- cull the supplier you upload the production from
4- Region - choose the region
5- Advanced options- Configure advanced settings like Allow duplicates, upload variations, etc.

Note that if y'all uncheckthe 'Upload Variations' the product will be uploaded as non-variant product, and you at that place won't exist an option to add variations for this production in the future.
half dozen- Click on the arrow and cull the upload procedure:
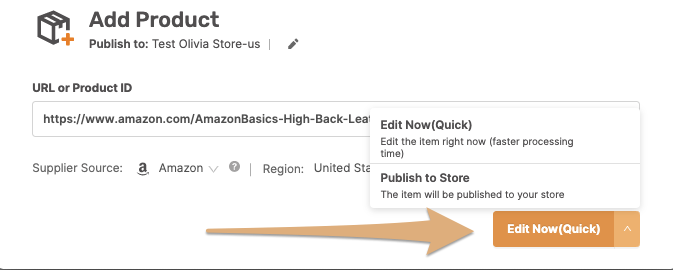
If you choose to 'Edit Now (Quick)' y'all will be forwarded to the edit page. Click here to acquire how to edit a single draft.
After yous finished the edit, y'all can choose to only 'Save' and upload later from drafts page or 'Save & Import' and the production will be uploaded to your shop.

If you choose 'Publish to Store', the product will be imported straight to your store.
Multiple products/Stores
In this Import method, you will be able to add your product ID or URL to upload a single list or several listings in a majority action.
Please check the featured numbers in the following image. You will observe a detailed caption of each featured number underneath the image.

1- You can click the✎icon to change the store y'all want to upload to or add more.
2-To upload a single production add your product URL or production ID of one of our supported suppliers.
iii- To upload in bulk, drop a CSV file to upload a list of items in majority. You tin can download an example file to make certain your CSV is in the right format.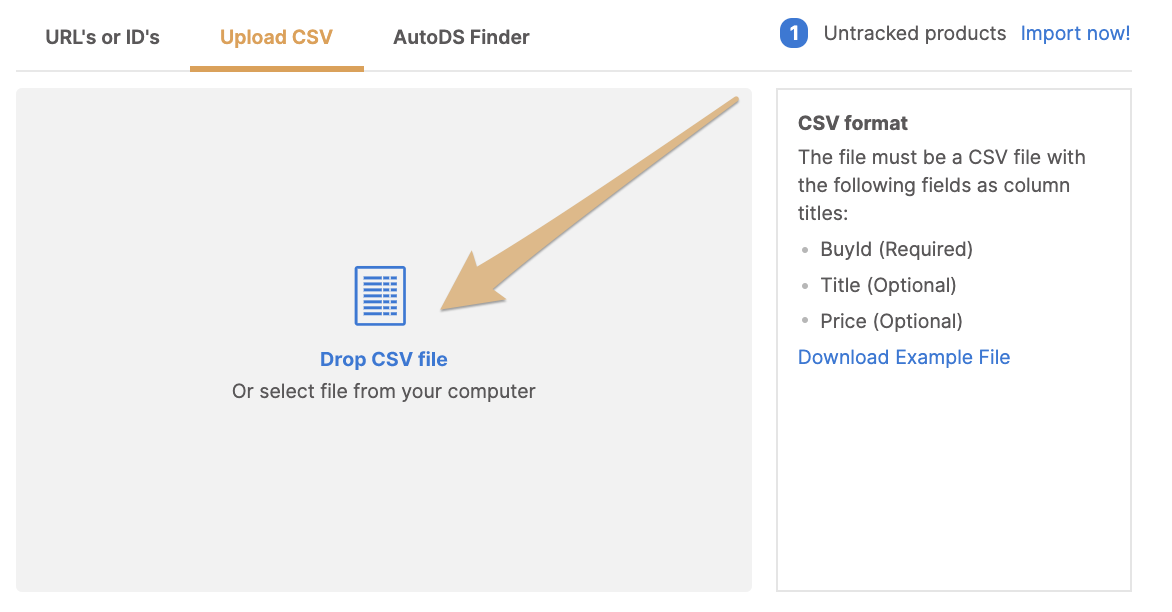
iv- Upload hot-selling items using the AutoDS Finder characteristic. Acquire more about information technology here.
v- Choose the supplier source site
6- Cull the region yous are uploading the product to
vii- configure avant-garde settings like Allow duplicates, upload variations, etc.
Annotation that if you uncheckthe 'Upload Variations' the product volition be uploaded every bit non-variant product, and yous there won't be an option to add variations for this product in the future.
Click on the pointer and choose the upload procedure:
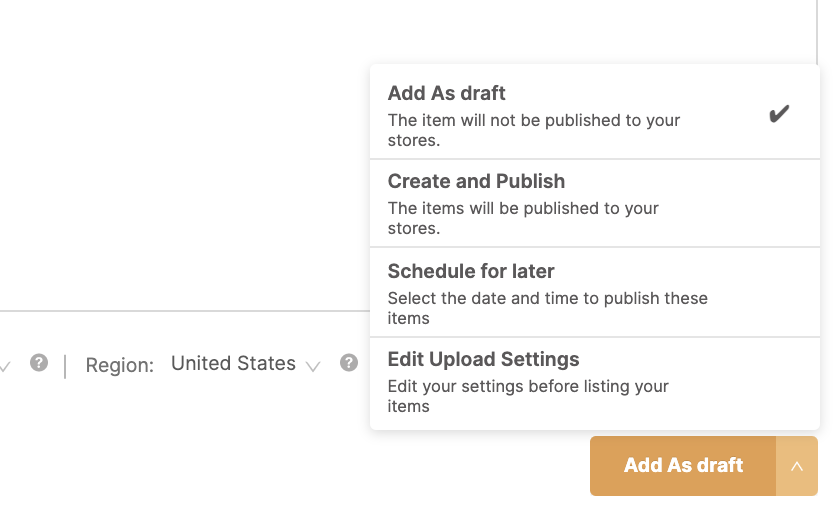
- Add every bit draft, so you tin edit it afterwards
- Create and publish now to your store
- Schedule for later- click here to learn virtually this feature
- Edit upload settings before product listing
If y'all choose to 'Edit upload settings' before upload, the system will forward y'all to a new page where y'all can go through the post-obit 5 stages:
 i. Products
2. General
iii. Pricing
four. Shipping & Policies
5. Import to Store
Full general
Please check the featured numbers in the following prototype. Yous volition find a detailed explanation of each featured number underneath the epitome.
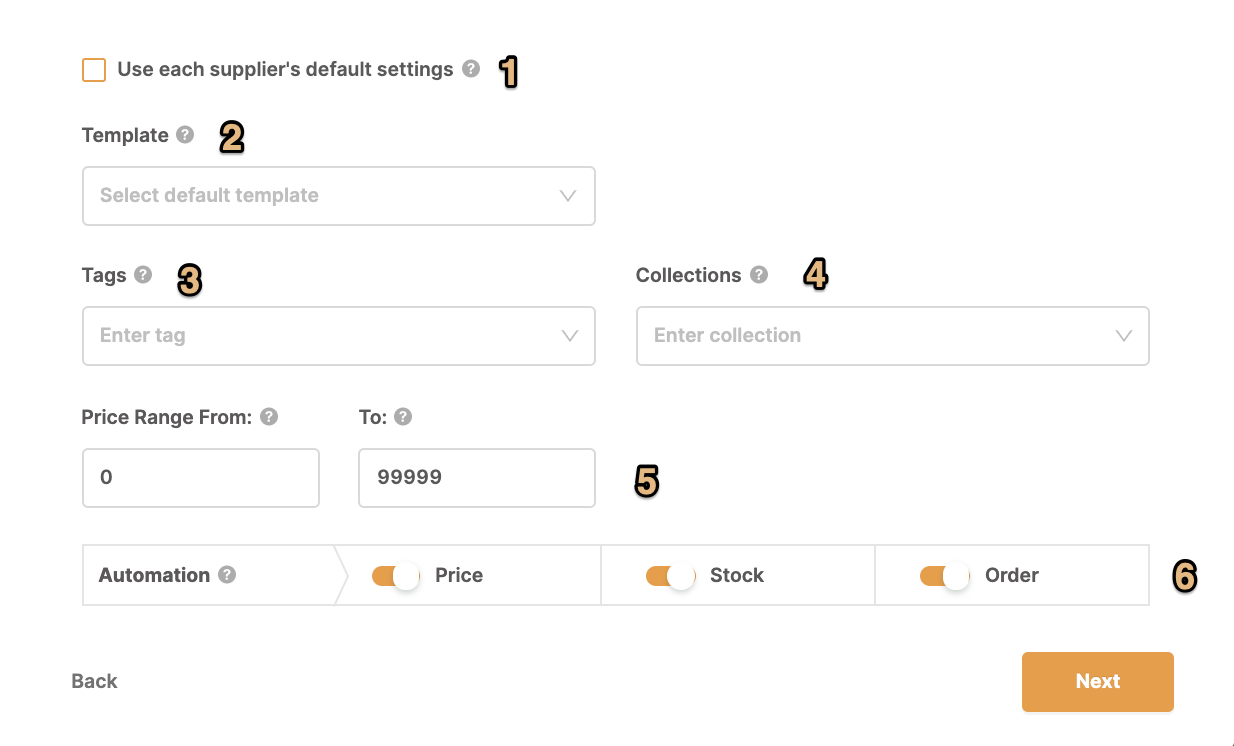
1 — Check the box if yous wish to employ the default settings y'all have stored for this store and supplier. If you practise, all fields volition be greyed, and you can skip to the next stage past clickingNext.
2- Choose a template (It's not a must to choose information technology now, you lot can set it up first on the settings page to learn how to do that click here).
3- You tin can choose to add a tag to your upload. For case, if you're uploading a product for Christmas you might desire to add a tag called 'Christmas' so you lot tin after easily observe the product and remove it When Christmas is over.
iv- Choose a collection y'all want this product to be added to. This applies to Shopify uploads simply.
5- Select a price range for the item\items you are uploading.
vi- Enable\Disable the monitoring for cost\stock\ order
ClickNext.
Pricing
Please check the featured numbers in the post-obit image. You lot volition notice a detailed explanation of each featured number underneath the image.
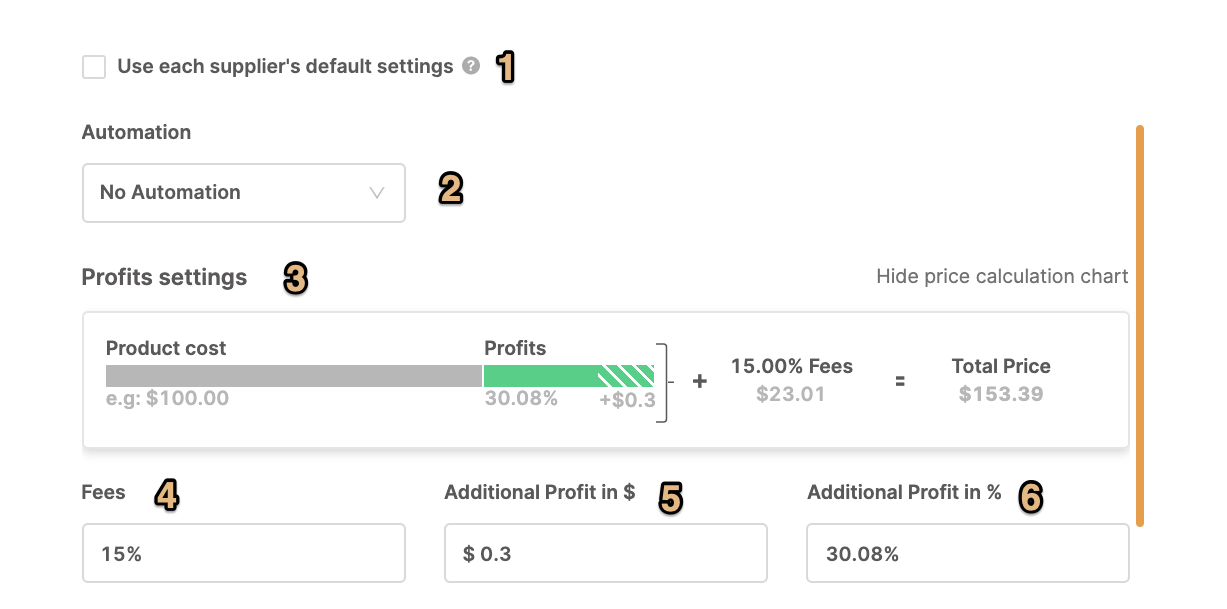

1- Check the box if you lot wish to use the default settings you take stored for this supplier.
If you do, all fields will be greyed and yous tin skip to the side by side stage by clickingSide by side.
2- Decide if you lot want 1 of the automations you created to exist applied to these uploaded products. Yous can learn how to set the automations here.
3- Here you will encounter the product's price adding chart according to your settings
iv-Choose the fees you are paying to the selling site and the unlike payment methods (for instance PayPal fee).
5- Prepare the boosted profit in $ you lot wish for the item
6- Gear up the boosted % profit you wish for the item
7- Enable or disable the dynamic profit characteristic, setting a profit for your products past a range of prices:
 You can add more rules to cover as many price ranges as y'all wish.
Once yous're washed, clickSide by side.
Shipping & Policy
Delight cheque the featured numbers in the following image. You will notice a detailed caption of each featured number underneath the image.
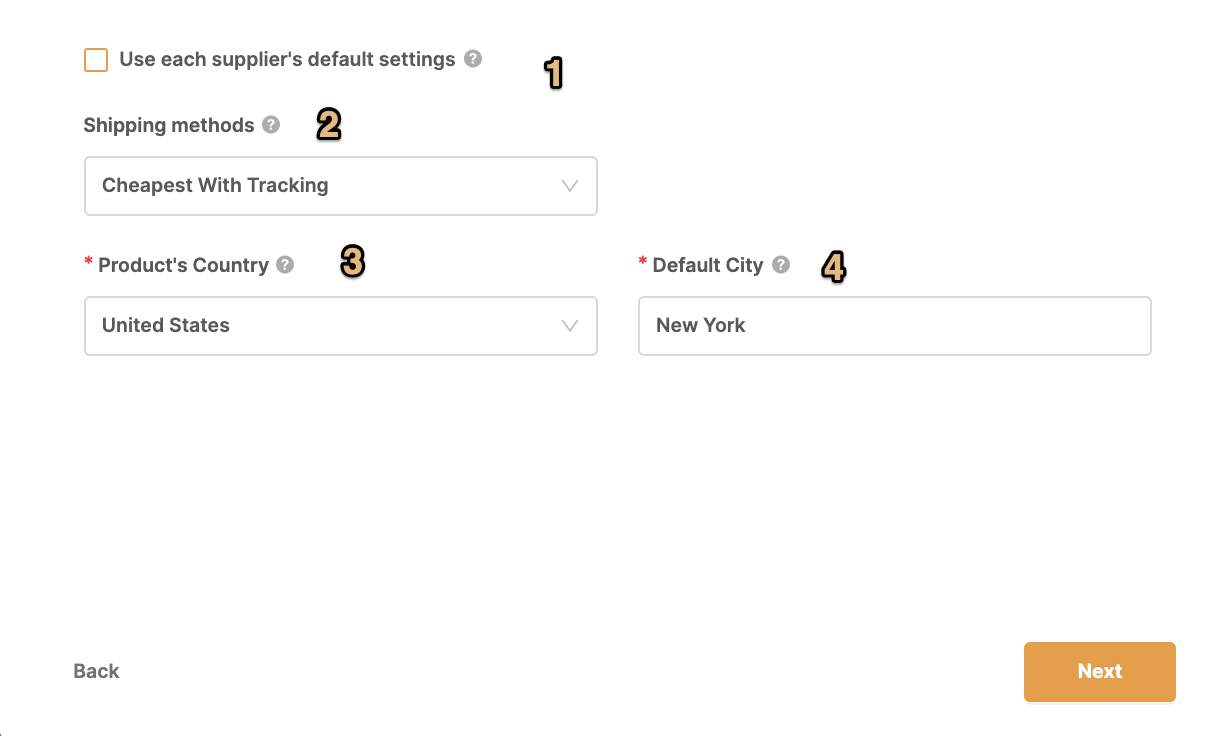
one- Check the box if you wish to employ the default settings you take stored for this store and supplier. If you practise, all fields will be greyed and you lot tin skip to the next stage by clickingNext.
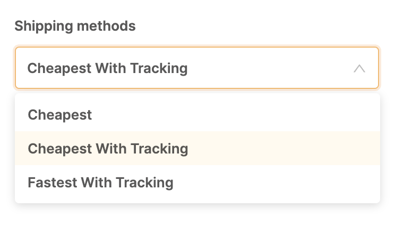
2- Check which shipping method you wish the system to monitor from the source site:
3- Choose the country from which yous're sourcing the detail.
4- Type in the city you wish your particular will be located in.
Import to Store

In this concluding stage, you tin choose toadd your item as a draft and so you can edit it more later before you import it to your store. You lot tin can Create and publish it immediately to the selling site or you tin Schedule the upload so it will be Imported at a after engagement yous select.
You can learn more than about scheduled uploads in this article.
If you have further questions that were non answered in this article, delight do not hesitate to plough to us at the support chat - nosotros will be more happy to help you.
castellanosifeenchall.blogspot.com
Source: https://help.autods.com/how-to-add-products-to-your-shopify-or-wix-store-using-autods
0 Response to "Want to Learn About Bulk Uploading to Shopify"
Postar um comentário